


Customer support is an essential process in any B2C company, yet an inevitably repetitive one. This makes it a great use case for AI assistance - but how do you ensure customers get accurate information? Most companies are reluctant to hand over the reins entirely to the limited brains of AI, but could certainly do with the boost in productivity from AI-generated responses.
That’s why we built this tool: an AI-supported customer chatbot app, connected to the Intercom API, which helps customer support agents by generating an accurate response fast, which they can then customize with the human touch. All this, whilst the LLM continues to learn better answers every time you use it.
Here\'s how it looks when finished:
In this article, we’ll show you how we built a tool that uses contextual vectors to prompt an accurate customer support response, which support team members can quickly review, edit, and send. We built this app on Retool, so it’s highly customizable and extensible for further functionality.
Integrating with Intercom Chatbot Functionality
Intercom is a widely used customer support chatbot with tons of features. While they do offer an AI-integrated option, each response costs companies 99 cents - which can quickly add up. These responses are generated from the context you provide them, but users don’t have the option to review these AI responses before they are sent to customers, meaning that they could also be inaccurate. The questions could also be misunderstood by the chatbot, which then gives clunky mistaken answers.
What’s more, many customers are aware of the proliferated use of AI and are put off by an evidently computer-generated response, rather than seeing your team take the time to really tend to their needs. This app allows you to add an extra human step to your interactions with customers, ensuring accuracy and understanding - and ultimately the human touch - in the response, all while being aided by the increased productivity of AI responses.
Let’s get started with building the app.
Connecting to the Intercom API
First, sign up or log in to Retool.
Next, you’ll need to connect to the Intercom REST API. In Retool, under ‘Resources’, click ‘Add new’ and select REST API. Here, you will need to add the details of your Intercom API and connect via auth.

Now open a new app and create a query \'getAllConversations\'. Select the Intercom API resource that you created moments ago. You can then insert the following values to query the API for all conversations.
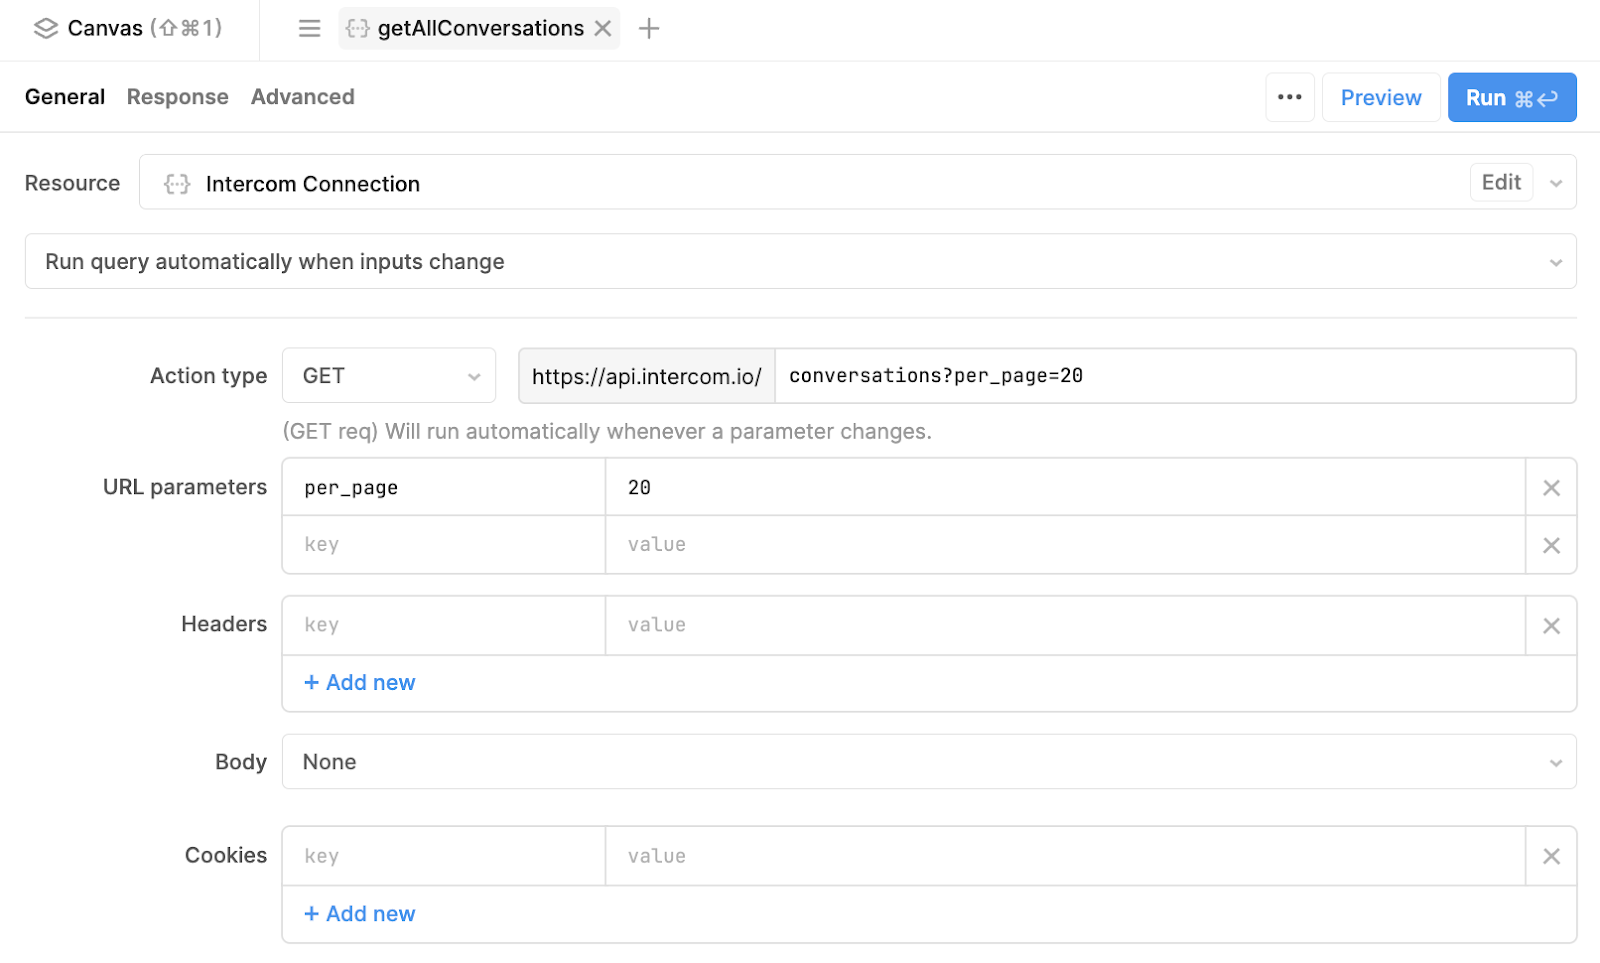
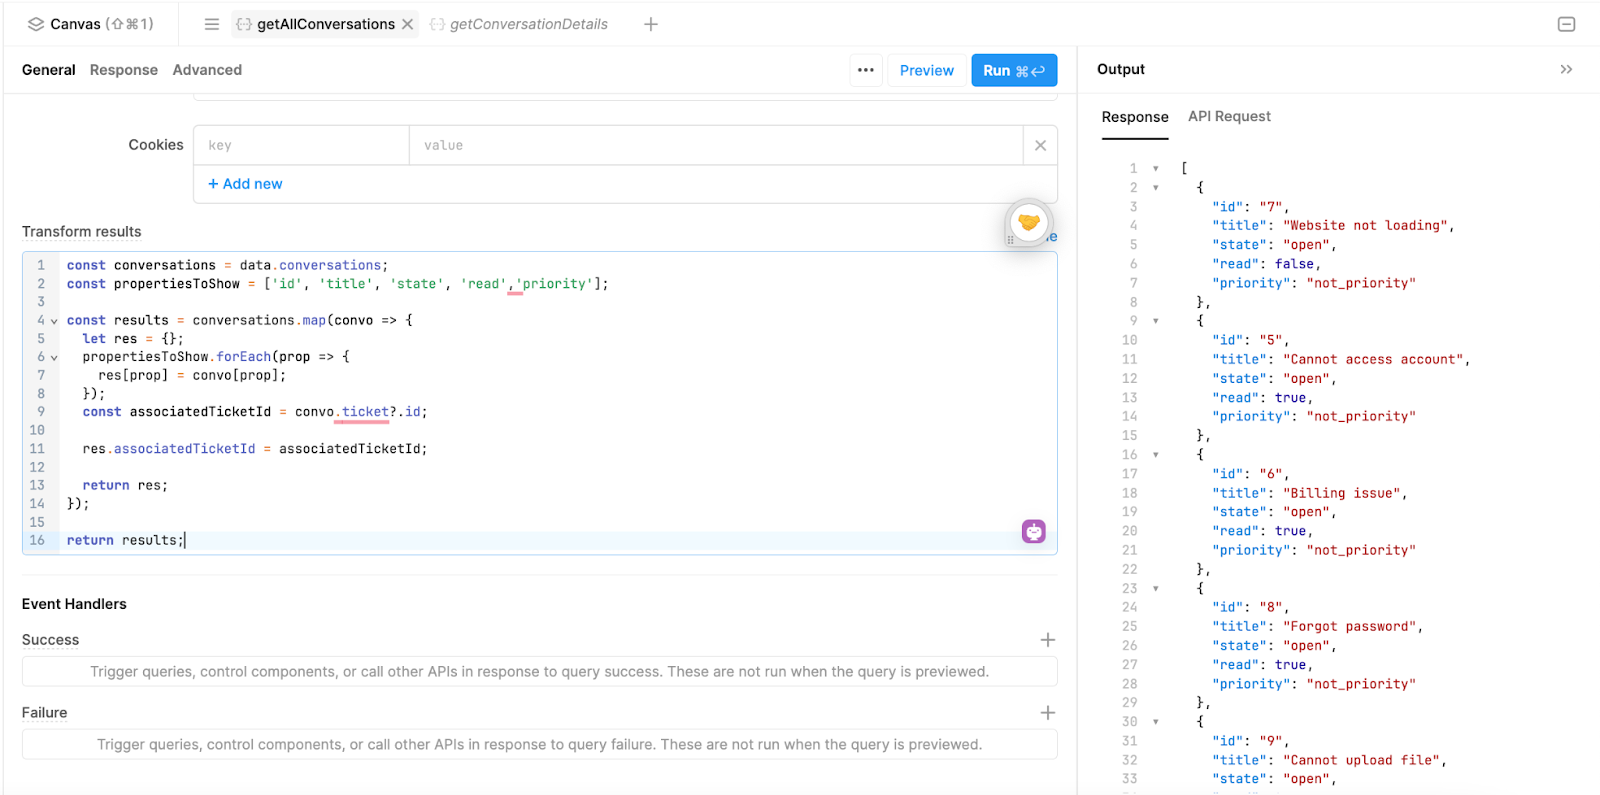
This query will return a huge amount of metadata, so we are then transforming this response data (under ‘Transform Results’ in the query) with this JavaScript:
const conversations = data.conversations;\nconst propertiesToShow = [\'id\', \'title\', \'state\', \'read\',\'priority\'];\nconst results = conversations.map(convo => {\nlet res = {};\npropertiesToShow.forEach(prop => {\nres[prop] = convo[prop];\n});\nconst associatedTicketId = convo.ticket?.id;\nres.associatedTicketId = associatedTicketId;\nreturn res;\n});\nreturn results;This JavaScript filters out all the irrelevant information from the query response and maps them to an appropriate format for the table.
This should return some data that looks like this:
Now, let’s pull in a table component to the Retool canvas to display this data.
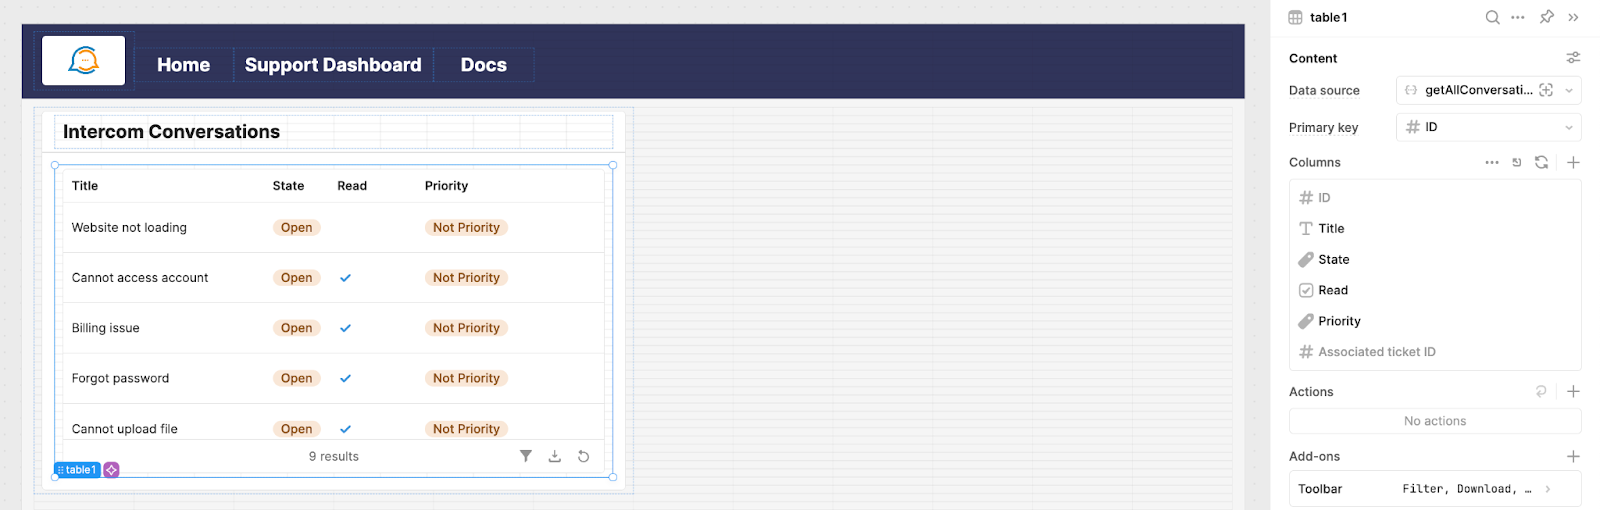
Under the table component settings, we set the ‘Data source’ to our Intercom query data \'GetAllConversations\'.
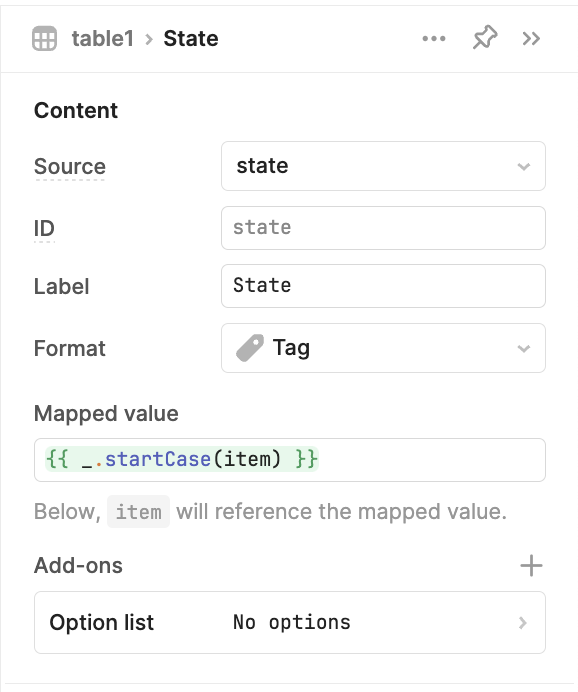
We also updated the State and Priority columns to display as tags under the column settings:
And the ‘Read’ column as a boolean type.
Adding the Intercom customer conversation details
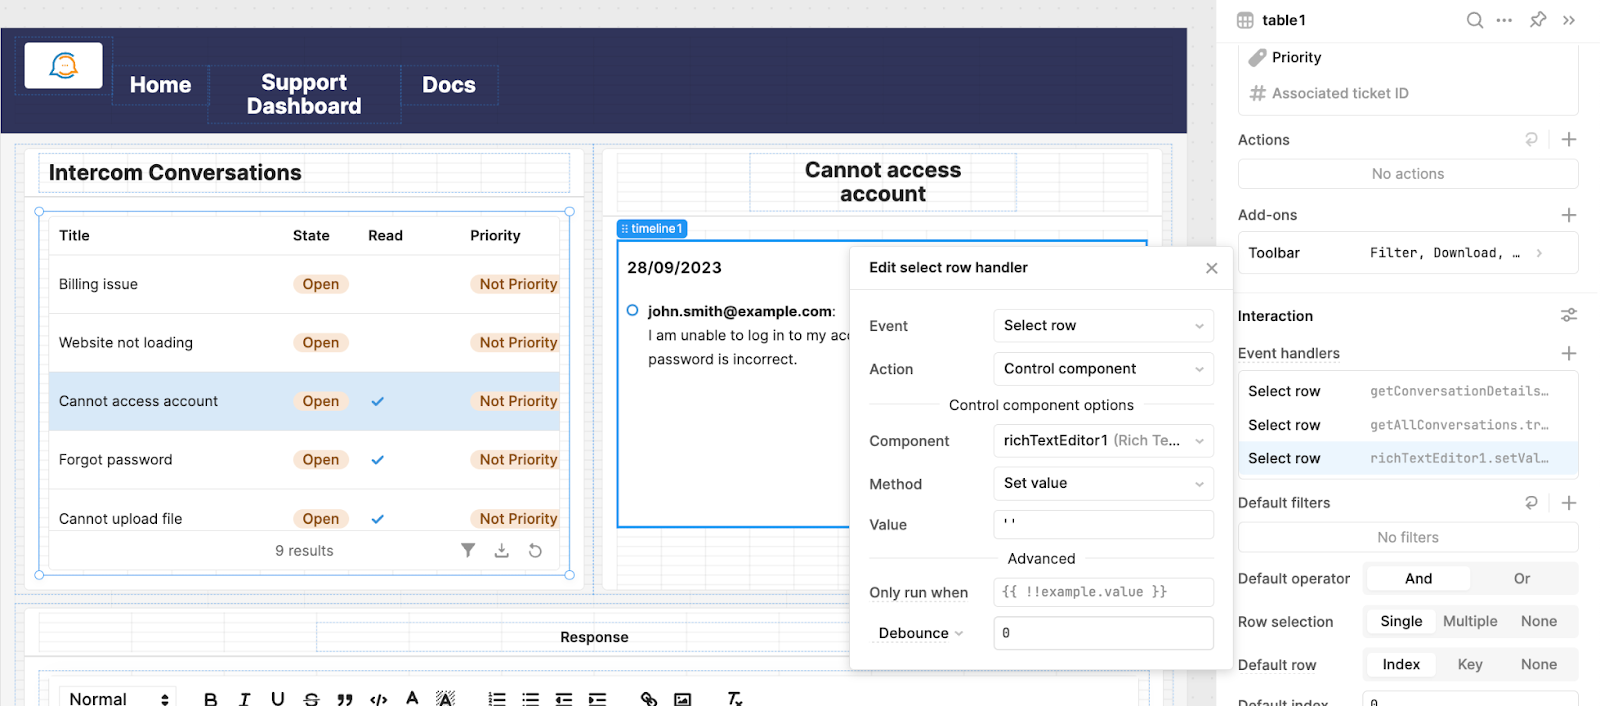
When a user selects a row in the table, we want the details of the conversation to open in another container.
To do this, we first created a query called ‘getConversationDetails’.
To trigger it and pass in some additional info, we set up a script in the table component, which runs when a user selects a row. This triggers the getConversationDetails, and passes the conversation ID as additional scope.
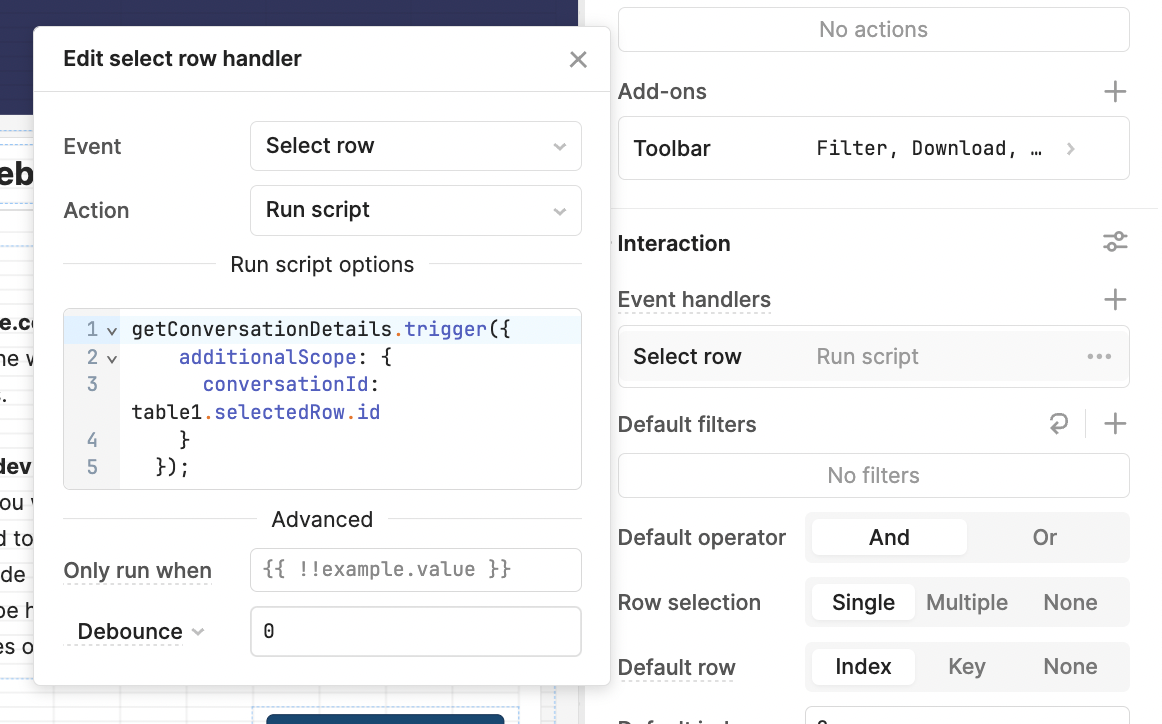
getConversationDetails.trigger({\nadditionalScope: {\nconversationId: table1.selectedRow.id\n}\n});We also added an event handler to the table that triggers the GetAllConversations query to ensure the table data is updated:

Now, in our conversation details query, we’ll use the conversation ID value to query the Intercom API and return the conversation history, using the values below.
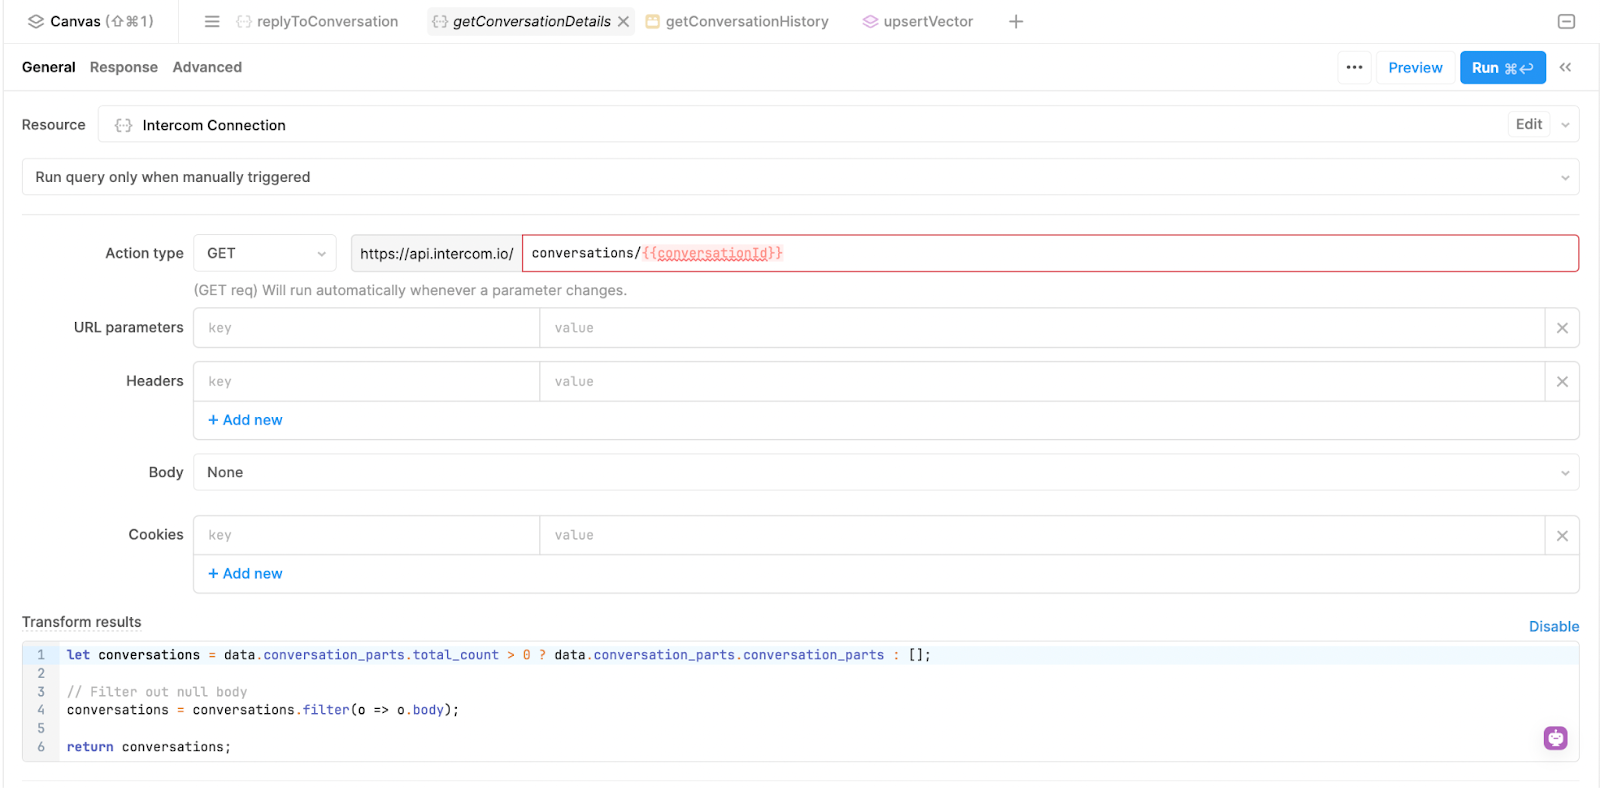
This takes the ID of the selected row and calls the conversation data from the API according to that ID.
Here is the JavaScript to make sure no blank conversations are returned, which we added under \'Transform Results\':
let conversations = data.conversation_parts.total_count > 0 ? data.conversation_parts.conversation_parts : [];\n// Filter out null body\nconversations = conversations.filter(o => o.body);\nreturn conversations;This JavaScript filters out any conversations which do not have any values to keep data clean.
To finish this section, let\'s add another container to the right-hand side of our conversations table. We set the title of the container to the title of the selected row\'s conversation using #### {{table1.selectedRow.title}}.
We then pulled in a timeline component and connected it to this conversation details query:
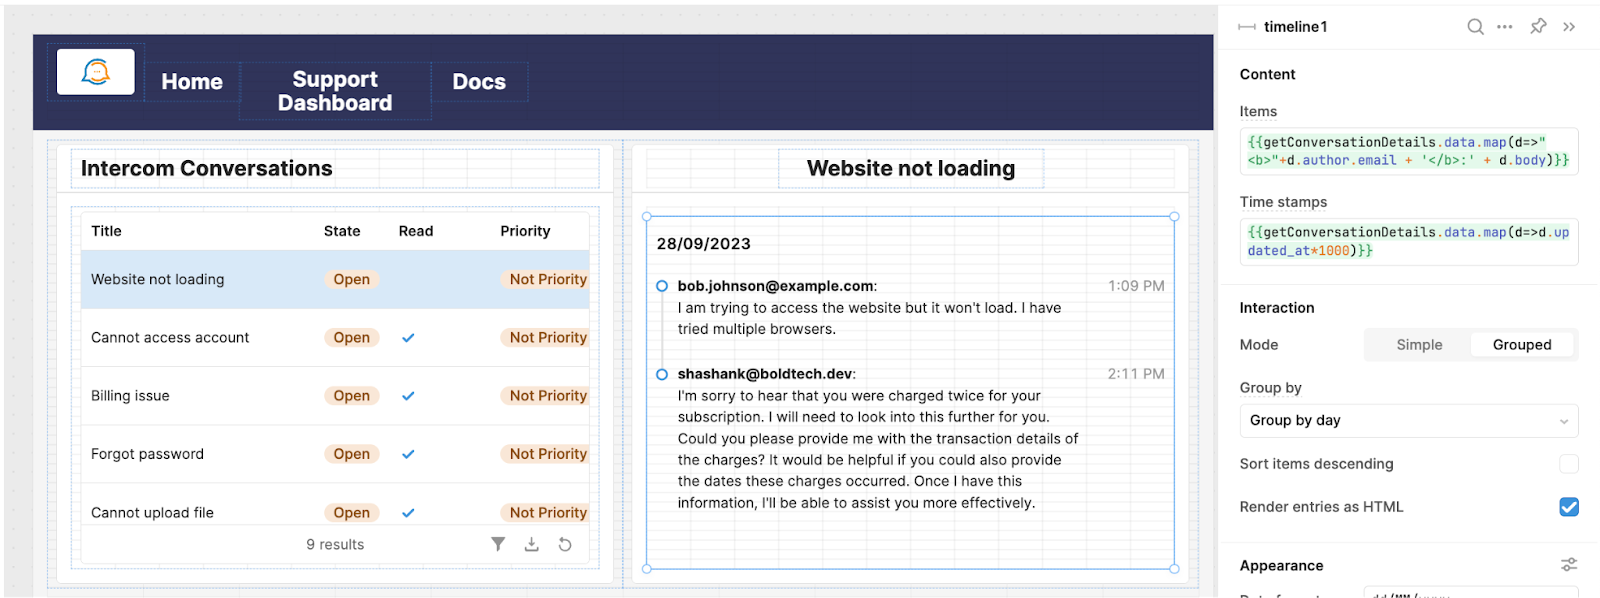
This JavaScript maps the items into the timeline array:
{{getConversationDetails.data.map(d=>"<strong>"+d.author.email + \'</strong>:\' + d.body)}}And this maps the timestamps:
{{getConversationDetails.data.map(d=>d.updated_at*1000)}}Now we have our conversations displaying in Retool, let’s add some AI generated responses.
Generating accurate an AI response (based on contextual Vector data)
Now we need a way to generate some logical responses to customer conversations using Retool\'s built-in AI features.
First, we need to create a JavaScript transformer to create a readable version of the conversation history for the AI chat. We will need the conversation to be formatted for this to work, so we added a JavaScript transformer to the code section with the JavaScript below:
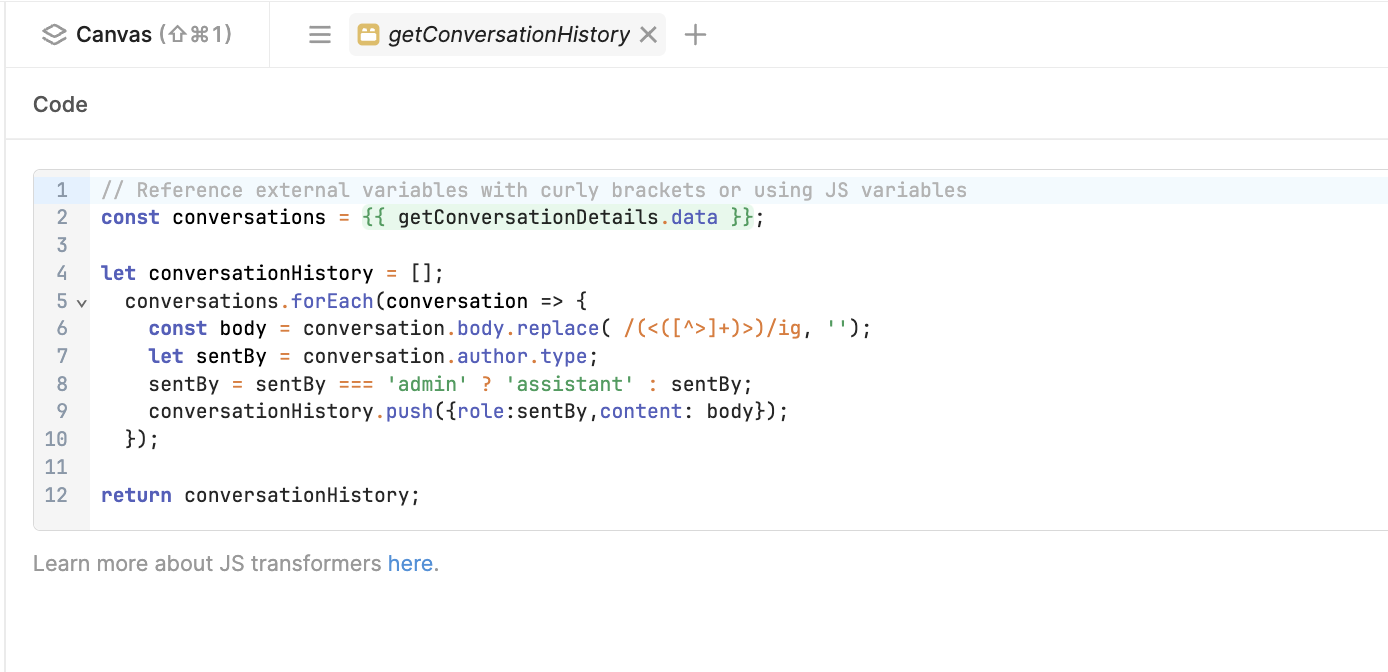
const conversations = {{ getConversationDetails.data }};\nlet conversationHistory = [];\nconversations.forEach(conversation => {\nconst body = conversation.body.replace( /(<([^>]+)>)/ig, \'\');\nlet sentBy = conversation.author.type;\nsentBy = sentBy === \'admin\' ? \'assistant\' : sentBy;\nconversationHistory.push({role:sentBy,content: body});\n});\nreturn conversationHistory;Now, we’ll add our AI action.
We\'re going to use the Retool AI action to generate a chat response that can act as the basis for our customer support reply.
To get started, add a new query and select the Retool AI.
Set the query to run when manually triggered, and the action to generate a chat response.
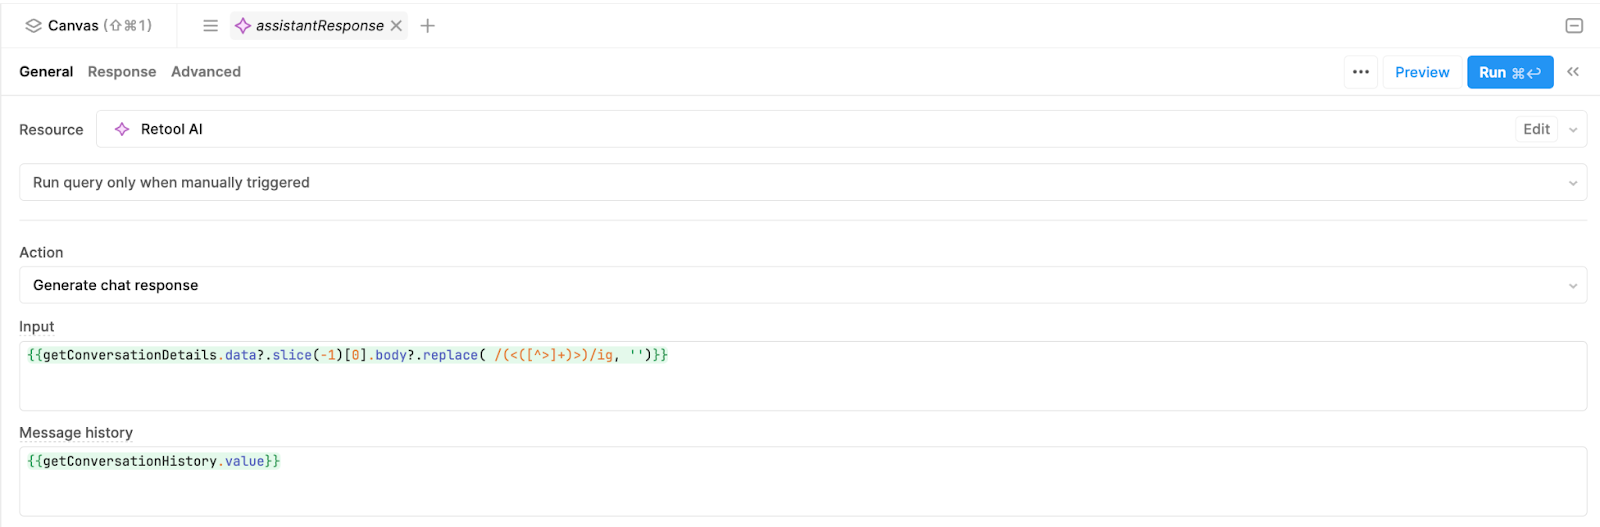
For the input, we will reference the data of the Conversation details query - which is the last message in the conversation currently selected.
{{getConversationDetails.data?.slice(-1)[0].body?.replace( /(<([^>]+)>)/ig, \'\')}}The JS here will remove the HTML formatting into a normal string so that the model can understand it.
In message history, to give the chatbot more context, we will reference the customer conversation history using the getConversationHistory transformer we just created.
Now, for the next part of the query, we are going to add some more details:
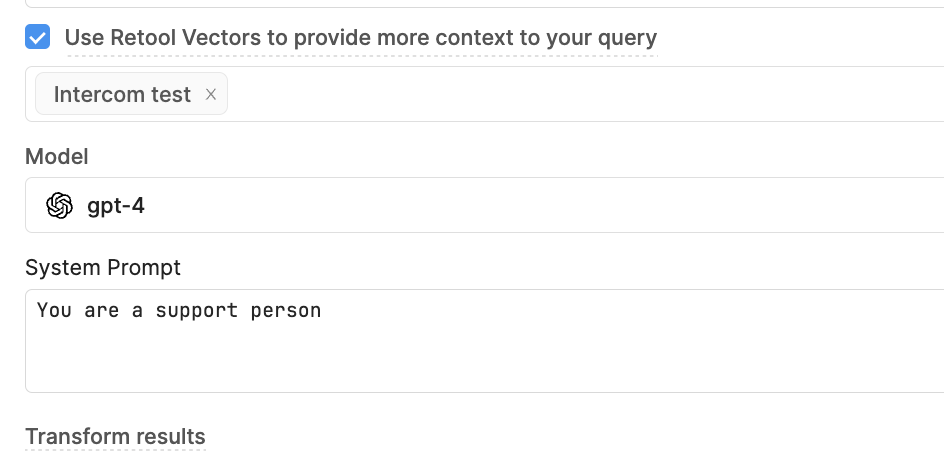
We’ve chosen the Open AI GPT-4 model and have also prompted the chatbot that it’s a ‘support person’. We’ve also set the Vector to reference our intercom Vector DB - we’ll come back to that in a moment. If you haven’t yet set up your Vector DB, you can leave this blank for now, and add it in once it\'s all set up.
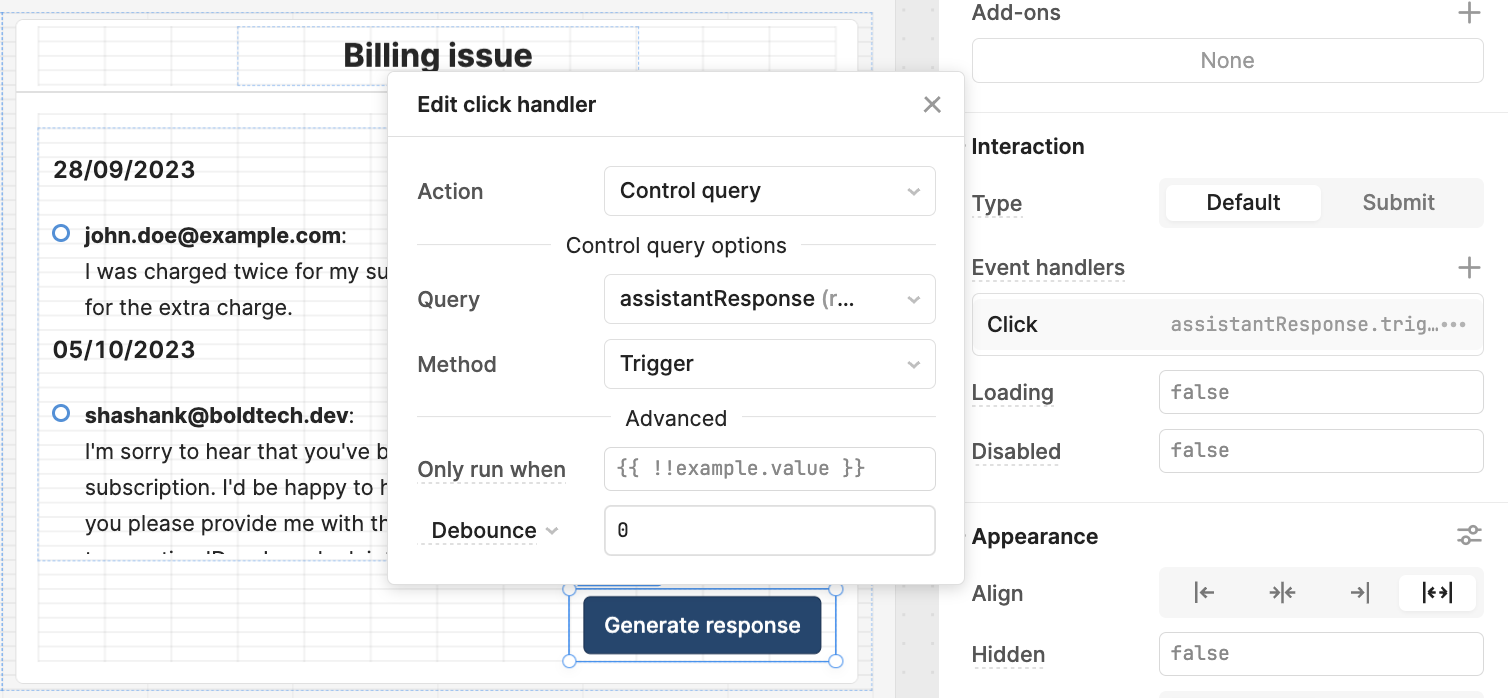
To generate this response, we just need to set up a button in the UI. Pull in a button and set up a click handler to fire your respective AI smart query:
Now to present the response, we’ll pull in a container with a rich text editor, where your support agent can proof and edit the chatbot response before sending it. We’ve connected that data to the value from the AI assistantResponse query. The default value is blank if there is no AI response available.
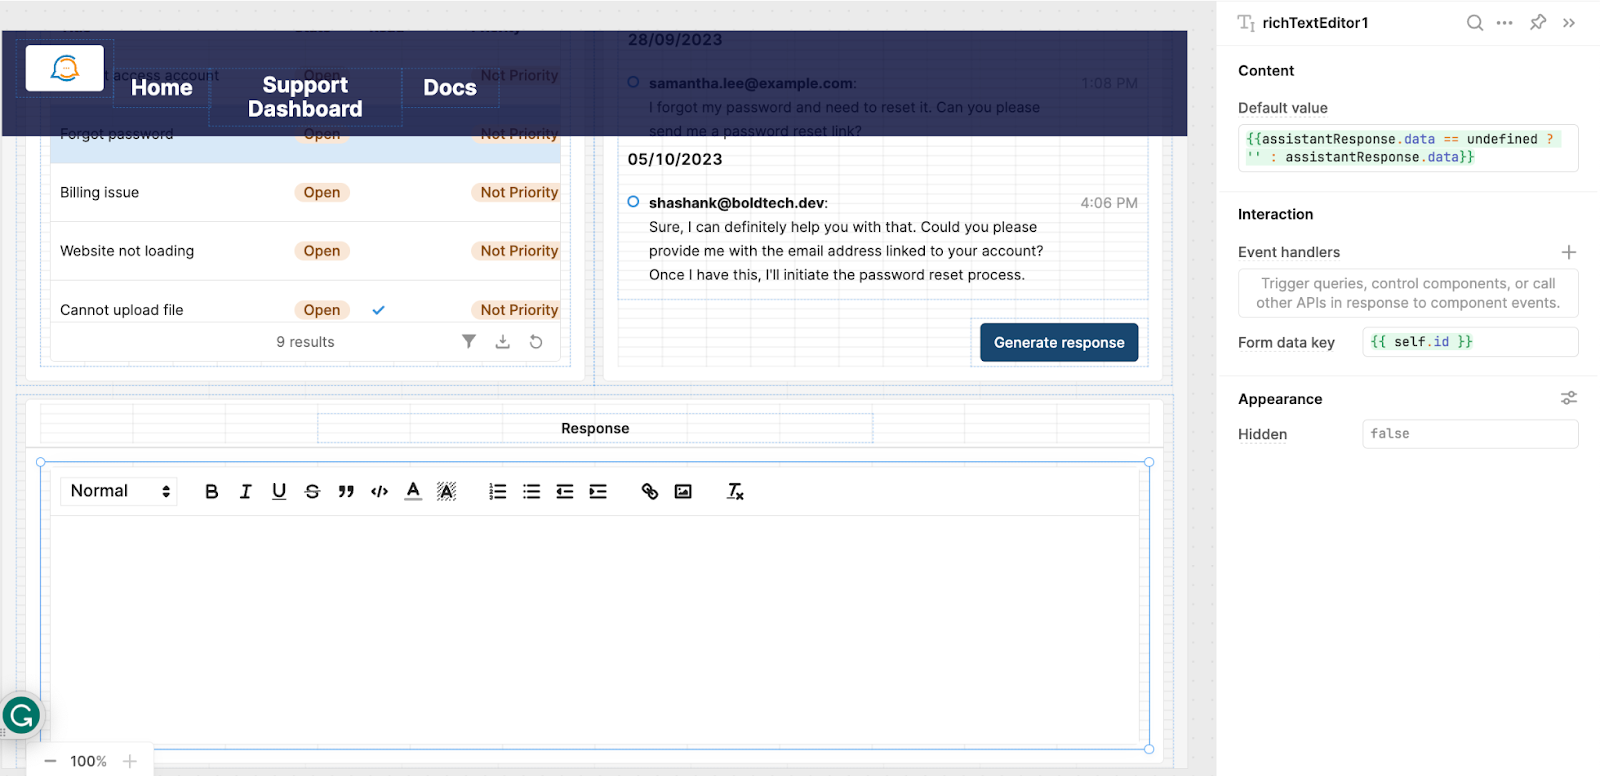
Now, when the generate response button is clicked, the Retool AI query will begin generating a response in the rich text editor. Agents can then directly edit and format this response to make sure it is accurate.
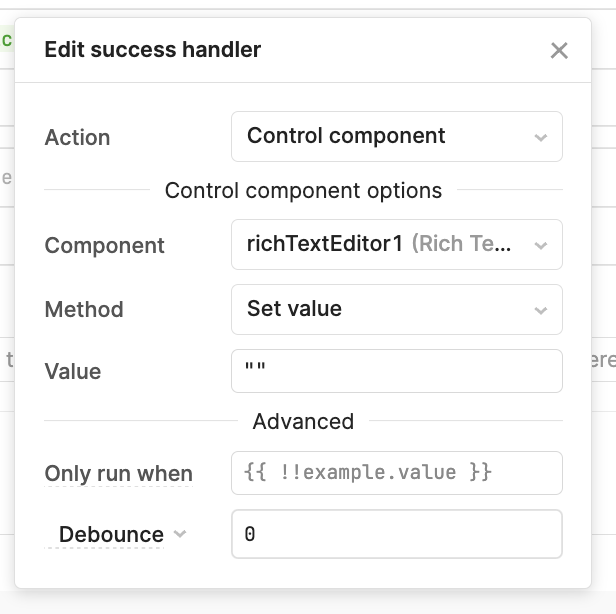
As a final UI touch, we also set the value of the rich text editor to clear when a new row is selected, to avoid sending the wrong response:
Next, we’ll add a button and some queries to send this reply back in Intercom.
Sending the response back via Intercom API
For the final step in our UI buildout, we need to add a button to the rich text editor that triggers the replyToConversation query, in order to send the reply in Intercom via the API.
This is what our query looks like to send this response:
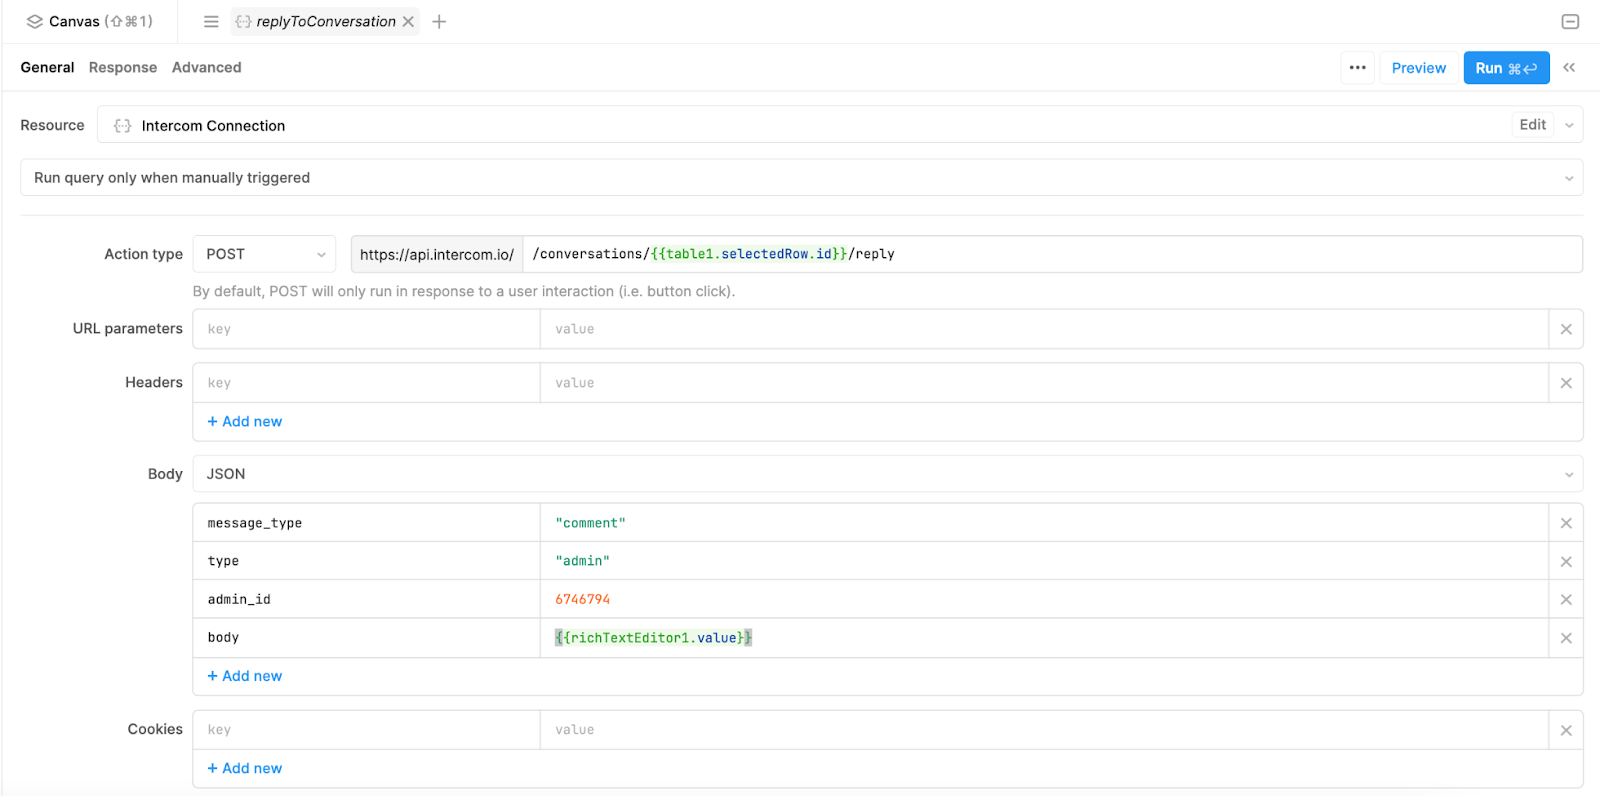
Using the POST action type, we will send the message back to the correct conversation using the selected row ID from the table. In the JSON body, we have indicated some fixed values for the API, including message_type as \'comment\', the type as \'admin\' and the admin_id as our Intercom admin\'s ID. The body of the message will be populated with the dynamic value of the rich text editor.
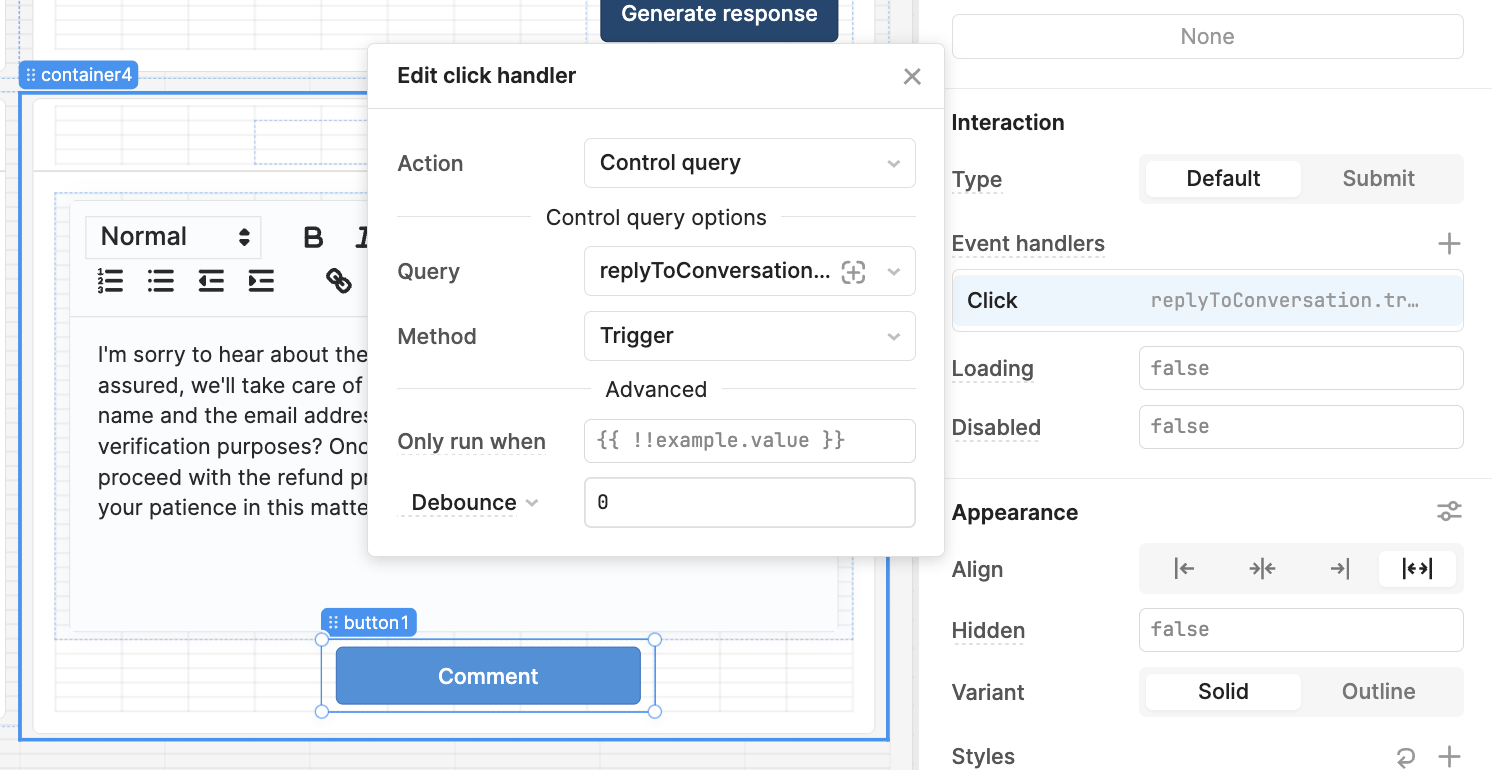
To trigger this query to send the message back to the customer, we need a button. Pull in a button component and set the click handler to trigger the replyToConversation query we just set up.
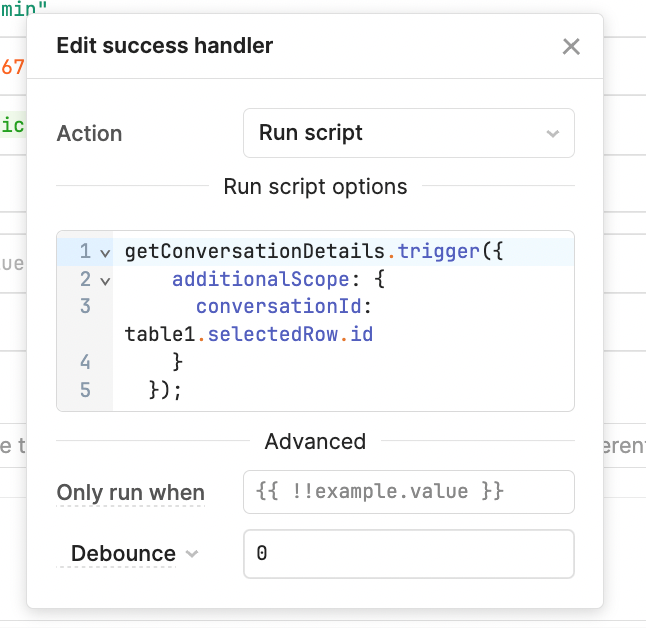
Once this query is fired, we also want a few other things to happen. First, under the \'On success\' part of our replyToConversation query, we want to trigger the ‘getConversationDetails’ query to refresh our conversation data, again passing through the additional scope.
We also want to clear the rich text editor to avoid another accidental send of the same message:
Now, with just a click of the button, users can respond to Intercom queries from Retool - with the help of Retool\'s handy AI features!
Using Vectors to inform and improve responses
For our final trick, we are going to use Retool\'s brand new Vectors features to give the AI chatbot better context from your company docs to generate more accurate customer responses.
In the AI query we already set up, we have already referenced our ‘Intercom test’ Vector DB. If you haven\'t already set up your Retool environment with Vectors, that\'s what we will set up here.
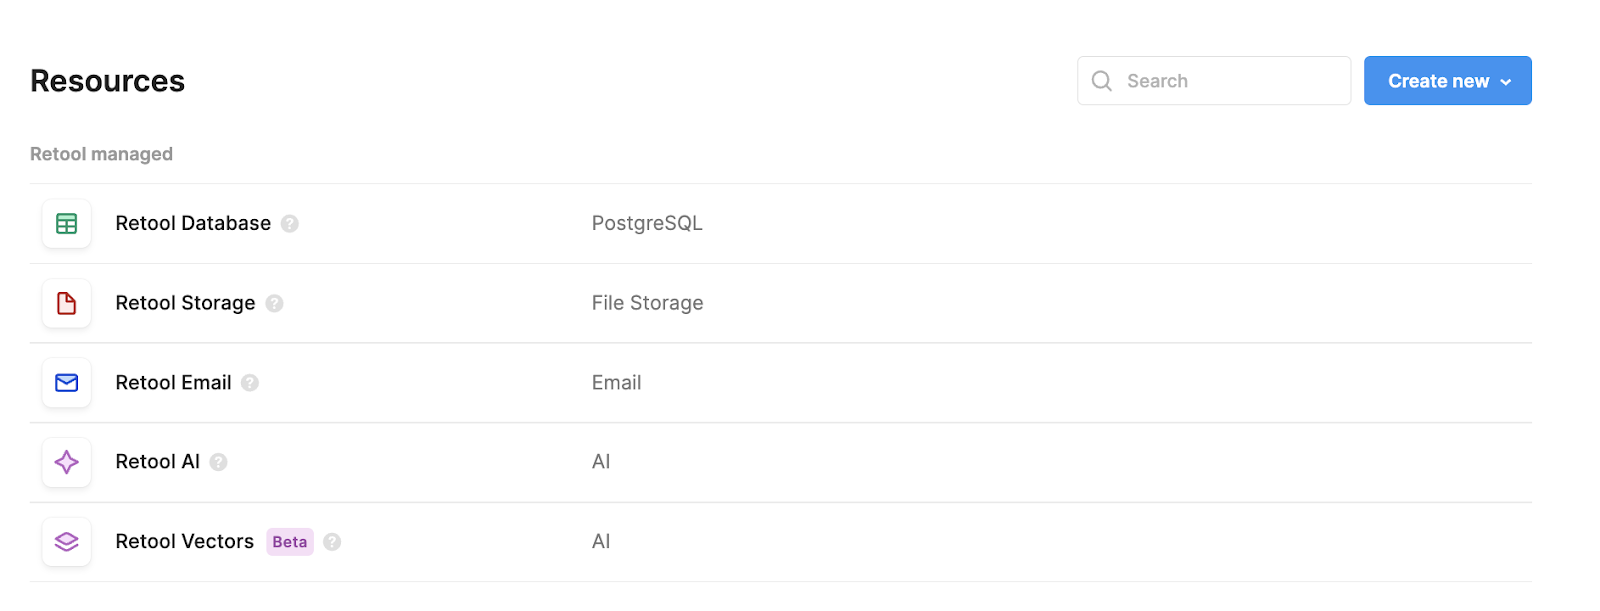
To set up your Vector DB, head to Retool’s Resources page and click Retool Vectors:
Then, click ‘Create Vector’:
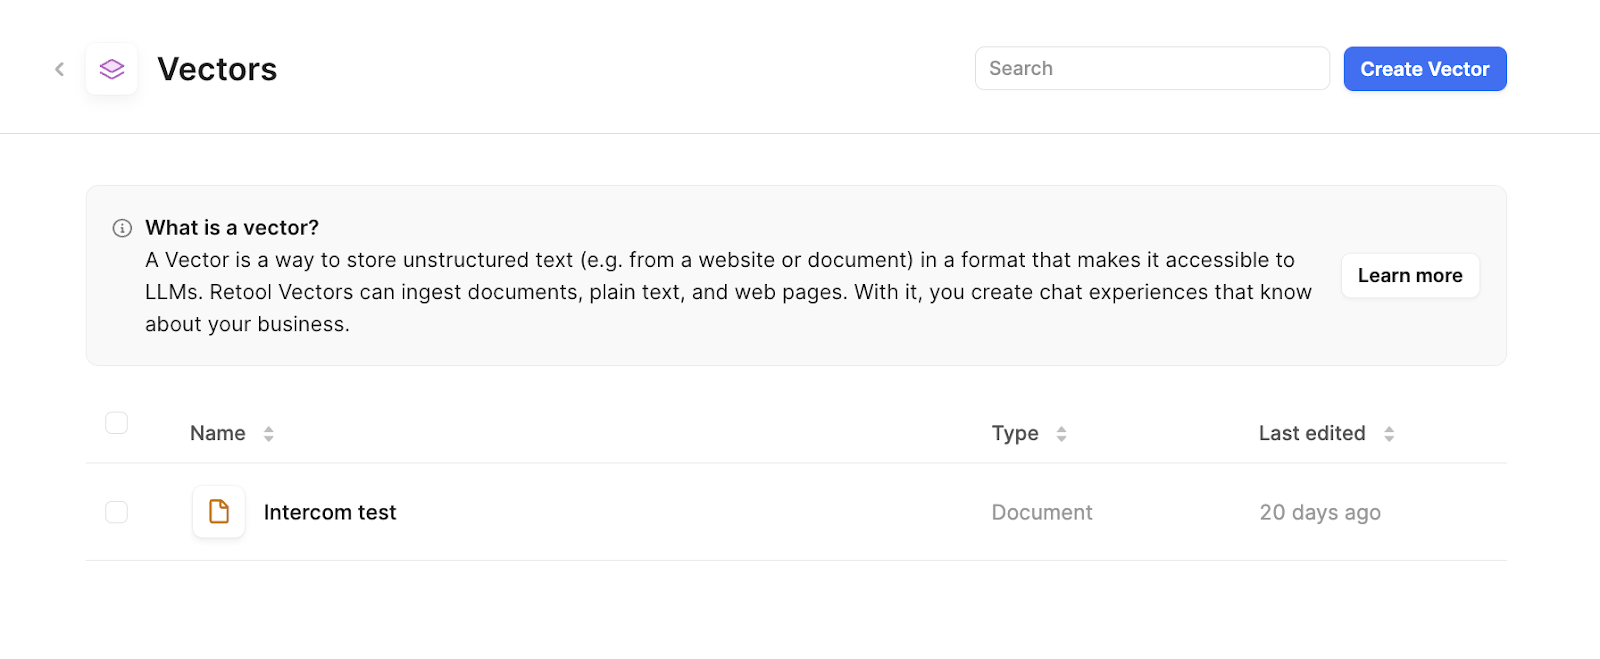
You can either select to upload documents, or use websites to crawl for information. This means you could first set up a Retool Vector as a crawler for your own sites and other relevant ones, and then another with this detailed information, and reference them both in your customer support response.
For our self-improving customer chatbot model, we need to create a Vector DB with the option to upload documents/plain text. Then we can insert plain text info or docs that will inform the model on how to respond to support queries. Whenever a support agent resolves a problem using the Retool app, they can send this back to the Vector DB to further enrich and improve the model’s responses.

Once you have set up the Vector with your company information and example conversations, the last thing to do is set up the responses to be sent back to this database from your app.
Back inside our app, we need to make another transformer to format the conversation for the Vector database:
const id = table1.selectedRow.id;\n const convos = await getConversationDetails.trigger({\n additionalScope: {\n conversationId: id\n }\n });\n \n let conversationHistory = \'\';\n convos.forEach(conversation => {\n const body = conversation.body;\n const sentBy = conversation.author.type;\n conversationHistory += `${sentBy}: ${body}\\n`\n });\n conversationHistory = conversationHistory.replace( /(<([^>]+)>)/ig, \'\');\n await upsertVector.trigger({\n additionalScope: {\n conversationHistory,\n conversationName: `Conversation ${id}`\n }\n})Next, we’ll add a query to write this information to the Vector database.
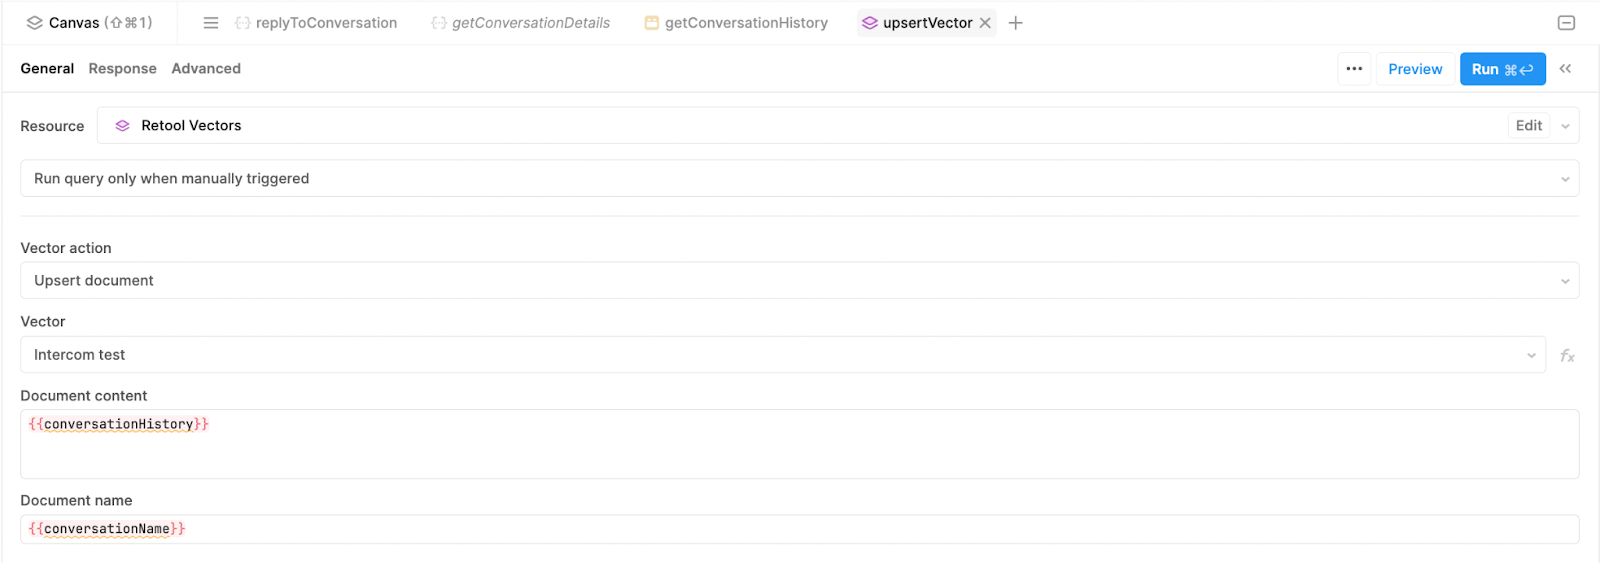
We’ll call this ‘upsertVector’. Under resources, select Retool Vectors. Then, set it to run when manually triggered and the action to ‘Upsert document’. Under ‘Document content’, we’ll reference the conversation history variable, and under document name, we’ll name it \'conversation name\', which we also defined in the previous transformer.
Now, we’ll add a button to save this conversation to Vectors. This means that users can choose to save a conversation to the Vectors DB, and can therefore only save the best resolution cases as an example for the AI to draw from.
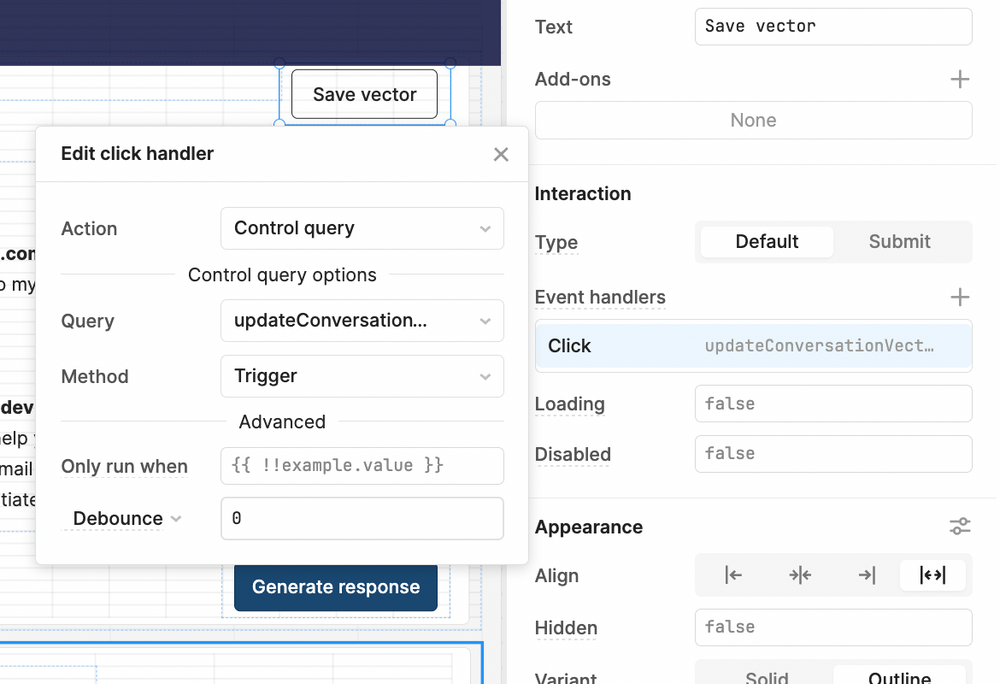
Now, once the user clicks the button, the conversation history is formatted and saved to Retool Vectors to be used as a reference point for future AI queries in the app.
Your bespoke customer support chatbot with AI-assistance and Intercom integration is now finished!
Want to learn more about internal tools and how to build them? Check out our sections on low-code tools like Notion and Airtable, or developer tools like Retool and Windmill.

