

The Release Manager (or Versioning) in Retool is a super useful feature for splitting up your work into shippable units and version controlling your apps. Nevertheless, it can cause a bit of confusion, and it’s easy to make a big mistake: overwriting recent dev work or accidentally pushing an unfinished app to the live version can be a little bit too easy sometimes, especially when working on the same app with other developers. In this post we will clear up how the release manager system works, and how best to work with versioning in a team to avoid any crucial mishaps.
Lingo
To clear up some of the terms we use, here is a glossary that you can refer back to if you need:
- Current working version - this is what you see in the Retool editing suite. There is only one current working version shared with all developers who have edit access to the app (although it may be cached differently if more than one person has the app open in their browser). When creating a draft release or published version, the current working version is what’s promoted.
- Live/Published Version - This is the version of the app that end-users, without edit access, can see and use. This is also what you see when you “preview” an application (unless you choose a different version to preview).
- Draft Release - This is a version of the app that you can only see in edit mode or with a link retrieved from edit mode and is a way of saving the app’s current working version at different stages. You can have more than one draft release and can promote a draft release to a published or live version. We explain this more below.
- “Revert to Version'' - This function reverts the current working version to whichever version you’ve selected.This is useful if you’re editing, you’ve made a mistake, and you would like to start back from a previous version. If you revert to an older version, you will still need to publish that version to be live for your end-users when ready since it reverts only the current working version. You can also revert minor changes in the ‘History’ tab of the Release Manager.
Using Retool Versioning
First things first, let’s take a look at how Retool Versioning works.
This release manager will allow you to create different versions of your app, helping to avoid many sticky situations - especially the ones we’ll go through in this post. This versioning feature allows you to create both live and draft versions of the app, and for multiple developers to save their own edits without overwriting other people’s work.
You can access this by clicking on the three dots in the top-right corner of your app, and selecting ‘Releases and History’.

This will bring you to a modal where you can create and publish your versions. Click ‘Create New’ to make a new version.

The next part is fairly self explanatory - decide whether the version is major or minor, or a patch, and make sure to describe your version clearly (only app developers can see this) to help communicate the differences between versions both to yourself and your team (trust us on this - always use the description).

The next step is either to create a draft release, or use the dropdown to create a live release: ‘Create and Publish’. For the first version you create when your app is ready to go live, go ahead and use the latter. When you are creating subsequent versions that aren’t yet ready to go live, create a draft release.
Here’s a rundown situation of how you might use this feature as a single developer, without a team:
- You create a snazzy app. The current working version is public and live to everyone with permission to view. At this stage, every change you make also appears in the live version (when they refresh).
- So, you head to your Release Manager and Create & Publish a Version 1.00.00 (adding a description, of course!). This defines the live version as Version 1.00.00. You have now created a distinction between the live app that is available to end-users, and the one that developers can edit in Retool. Now, whenever you make a change in your Retool working environment, it doesn’t appear in the live app people are using.
- You begin making a new version of the app to make some improvements. You are halfway through your process and you want the management team to preview the UX - so you create a Draft Release called Version 1.01.01 (and label it clearly in the description), now you can send that to people to test. This is a draft, static version that people can preview and play around with.
- BEWARE that preview links use production data ONLY. Although you may be showing them an app from the working environment and not the live one, anything they click or change in the data will affect the Live data.
- Once they are happy with this new version, you push it to the live app by hovering over the three dot menu next to the version and clicking ‘Publish release’.
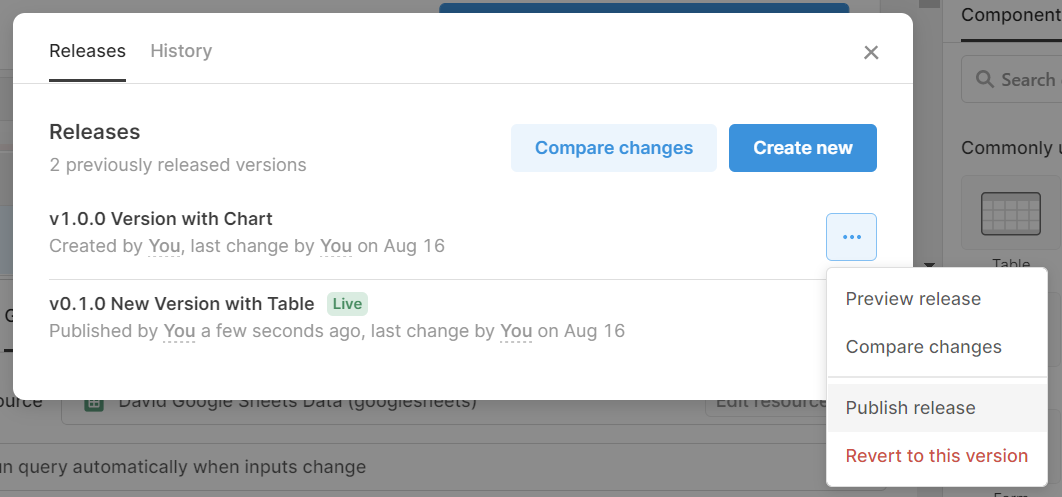
Another handy resource within this modal is the ‘History’ tab (as you can see in the image above), which allows you to see each individual change that has been made, and by whom. This is really useful to check through as well as compare changes, to see if someone else has been working in the app before you publish. You can also use this option to revert individual changes without reverting the entire app version.
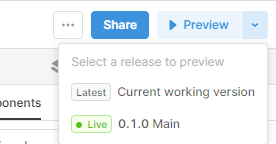
Now that you have different versions, you can preview each of them individually too - just click the dropdown icon next to the ‘Preview’ button and select which version you’d like to view (this is also handy for quickly seeing which Version is in the working environment, and which is currently live)
Back To The Basics - How the Retool Working Version... Works
If you’re not using releases in Retool, then the relationship between the app you’re editing and what your users see is pretty straightforward – they’re one and the same. If you’re building something personal or small, that may be no problem. But for mission critical apps, or even apps used by a team for an important task, you want to follow software engineering best practices and version your work.
A common misconception with Retool is that there is a staging and a production version in each app, and that a developer ‘pushes’ changes from staging to production. This issue probably arises from the ‘Staging/Production’ toggle in the working environment: this relates to your backend only, the Retool app itself is exactly the same in both cases, it is only the resource that changes - so that you can switch yourself to ‘staging’ and mess around with your app without touching the live data itself.
In fact, if you aren’t using the release manager, there isn’t a difference between the working version (what you see when editing your Retool app), and the live app that people are using. This means that edits you make in the working environment automatically apply in the live version when they refresh or re-enter the app, and thus, the editing and live app are the same.
Here’s an example situation to elaborate:
- You create an app for your team and they begin using it. Once the app is finished you share it with your users with the preview link (view only), without creating a release in the release manager
- Once the app is in use, you begin some updates to help improve the app
- User 1 is using the app to complete their work
- You add a table component to the app and begin connecting your resources
- As soon as User 1 refreshes the app (or closes and reopens it), the table component will appear in their app, whether you have finished your dev work or not
The good news is, it is entirely possible to create a current working version in Retool that separates from the live version using the Release Manager. Keep reading to learn how to do this (and if you already know - how to do it properly and avoid the easy mistake of publishing unfinished work).
Working together in Retool - Avoiding Overwrites
While it is possible to collaborate in Retool apps and do dev work together, it’s important to do so with care and great communication.
It is currently not possible to edit Retool apps (or be in edit mode) at the exact same time as another teammate. This may work in very rare circumstances, but 9 times out of 10, you’ll just delete another person’s work. Retool will show you if someone else is in your app in the top right corner - make sure to keep an eye on this! Communicate immediately with anyone who is looking at the app at the same time as you, as this is where big issues can occur.
The bigger problem: while it may be possible to negotiate separate times to work on Retool apps to avoid clashes, there is one critical way to cause major issues: the open tab overwrite.
If you take nothing away from this blog post, take this away at least: always close out your shared apps when you are done working with them. Why? Because when two people are working on an app at the same time, there are two parallel cached working environments trying to save to one version of the app, and it’s the last person to CLOSE the app, who saves their version, overwriting the other person’s work.
Let’s clarify this idea with another problem situation:
- Dev 1 makes some edits in the app, Retool is automatically saving their work as they go along, so they don’t think to click on anything when they are done. Dev 1 leaves the tab open on their computer while they go get some dinner.
- While Dev 1 is chowing down, Dev 2 jumps in the app to work on their section, completing tons of complicated queries and SQL filters. Dev 2 finishes up after a long few hours of strenuous dev work and closes the app to go to bed.
- Dev 1 comes back to their computer, checks Twitter for a while, sends a couple of emails and then finishes up for the day, finally closing the Retool app tab in their browser.
- In doing this, Dev 1’s version is saved, as they never refreshed their version to see Dev 2’s work, so they still have the version without all of Dev 2’s hard work.
- The next day, Dev 2 returns to their computer to find all their geniusness vanished into the cyber void - never to be retrieved again. Needless to say, today’s stand-up meeting is gonna be a little tense.
As you can see from this story, huge amounts of hard work can be lost, simply by one of your devs leaving the Retool app open in a tab of their browser. This is one of the easiest mistakes to make, and one of the most costly.
In sum: always close the app when you are finished working with it, even if just for a few hours.
Using Versioning in a Team
Here’s to our next common problem in Retool: the accidental-half-finished-edits publish. Many people are already using versioning within their apps to stagger releases, but what they aren’t doing is checking that the version they publish is correct and complete.
Here is an all-too-common scenario with dev teams:
- Dev 1 is working on Version 1.02.00 to add a brand new section to the app. This work will take a long time, and is currently halfway finished.
- Dev 2 is alerted to a critical bug in the live app (Version 1.01.01) and gets to work on an urgent patch (in theory: Version 01.01.02). Dev 2 jumps in the app when Dev 1 is offline, fixes the bug, and hits publish on the current working version so that they can report to their superiors that they have fixed the bug.
- What Dev 2 hasn’t realized is that, while they fixed the bug, they also published all of Dev 1’s unfinished changes.This means the live app, while less buggy, has a half finished tabbed container component (or the like) plonked in the middle of it, and its users are very confused.
As you can see in this scenario, Dev 2 mistook the working version to be a brand spanking new copy of the version currently live to users: Dev 2 didn’t understand that the current working version they just published included the edits made by another developer. They therefore missed one very crucial part of this process: Compare Changes. Communication between developers can’t always be perfect, but one way you can check up on the situation in the app before publishing is to check the changes of the version you are about to publish. This feature will show you a side-by-side comparison of the live and the version you have selected.
If you see a huge amount of changes (as well as your critical bug fix), you may be about to publish someone’s half-done work. Always (always!!!) check the changes before hitting publish on a version, as you never know what someone else has been fiddling with without you realizing.
Reverting a live version after an accidental publish
Okay, so you’re actually here because you’ve published half-finished work into your live application, and you want me to tell you how to fix it - no fear, we’re here (and all is not lost).
- In edit mode, head to the release manager, click the three-dots menu next to the old version and select ‘Revert to this version’ (we’ll call this Version 1.00.01). This should be the last live version before you made the accidental publish. Remember, this reverts the version to the working (editing) environment only.
- Now that you have your old version in the working environment, fix the critical bug in your application (the one that caused all of this chaos in the first place)
- Publish this fix as another new version (probably a patch) - let’s say Version 1.00.02.
- Now, you can go back again to the version with the half finished edits that were previously published from Step 1 (Version 2.00.01) and ‘Revert this version’. You will now have your half-finished version back in your working environment (with a bug fix), and a fixed iteration of your old version live.
A key thing to remember here is to communicate well with your team, and anyone else involved. A very simple mistake to make is a team member hopping into an app, updating a simple field to reflect an API change and hitting publish, without realizing how much they are really publishing.
How to Publish Small Changes and Fixes Without Losing Other Edits
So we’ve run through how to fix the problem, but here’s how to avoid it too. This is the best way to make a small update or fix when you’re in the middle of different edits that aren’t ready to go live.
- Jump into the app and create a ‘Draft Release’ in the Release Manager of the version you are in the middle of working on (let’s call this Version 02.00.00).
- Next, click on the three-dot menu of the version that is currently live (it will have a green ‘Live’ tag, and select ‘Revert to this version’ (let’s say Version 01.01.00). This will revert the version in the app editor only.
- Fix the bug in this version, then create a new release with a patch. Publish this release (Version 01.01.01).
- Once your app is fixed and live, head back to your release manager and revert the (working) version to the one you were initially working on (Version 02.00.00).
- Make sure to fix the bug/match the edits to those you made in the live version. Use ‘Compare Changes’ with the live and current version to make sure you haven’t missed anything before publishing.
Creating a duplicate app to work on bug fixes simultaneously
One option that may be useful for dev teams is duplicating the app - we would only recommend this as a way of working on an app (e.g. to figure out how to fix a crucial bug) at the exact same time. This may be useful if you have a critical issue that requires two eyes, but can’t afford to lose time by taking turns.
This simply involves duplicating the app in the app menu (the three dots in the top-right corner), working on the copy, and then redoing whatever fix you came up with in the original app. This isn’t really an ideal fix however, since you’ll have to replicate changes made in the original application once the other developer exits.
Tips for Working Together in Retool
- Always compare changes between versions before publishing, to make sure you haven’t missed anything unexpected
- Create a system of turn-taking that works for you, e.g. allocating certain hours of the day to each developer only, or having a lead developer that manages everyone’s time in-app.
- Communicate effectively within dev teams to make sure no one is overlapping, if you see someone working in the app, jump straight out and message them before continuing!
- Slam a big ol’ sticky note on your computer that screams CLOSE THAT TAB so you never forget to close out when you’ve finished working in the Retool editor.
TL;DR - A Summary
- The production and staging tab in Retool means data only, this switches the backend, but the app stays the same
- More than one person cannot work in the same Retool app at the same time
- The last person to close the app, saves their version. Never leave the app open in a tab on your browser when you are not editing it
- To make edits without affecting the live version, use the release manager. Create a draft release to edit that one, and then publish when you are ready to push to live.
- Never publish a version without checking the changes first. This is especially important when working in teams, as you never know if you are publishing their half-finished edits.
- You can also view and revert individual changes in the ‘History’ tab of the Release Manager, where you can see each change that has been made, and by whom.
- If you need to fix a bug or release a patch version while you are working on some larger, unfinished edits, revert to the live version before fixing this problem, publish this, and then revert the working back to the environment you were working on (make sure you fix the bugs/add the small edits to this one too!)
- For multiple developers needing to work on a critical bug at the same time (to try and find the solution) , you can duplicate the app and work in this copy version.


